Lighthouse’s Global Notifications Module can be leveraged to send out Reports as PDFs or Excel that have been created within its Report Builder Module. The Reports that are added as a merge field and sent out will calculate the recipient’s permissions in relation to the report, which results in a recipient that receives a report that contains data that they have permission to.
Pre-Requisites
Before you start, you will need to have created and saved a Report that you want to use as a merge field in your Notifications.
To Create
step 1: Click on cog/settings from your Navigation Bar and then Click Notifications
Step 2: Click Notification Templates Tab
Step 3: Click the [+] button to create a new Notification for your Report to be attached to.
Step 4: Give your Notification a Name so it stands out in a crowd.
Step 5: Click the edit icon to create a Subject for the Email Notification
Step 6: Create the Body of the Email that will be sent out. Lighthouse’s Notification Templates come with various merge fields that can be used to personalise the Email Notification that is being sent.
Notification Merge Field
| Field | Description |
| Email to first name | This uses the recipients first name |
| Email to last name | This uses the recipients last name |
| Email to salutation | This uses the recipients salutation |
System Field Merge Field
| Field | Description |
| System Title | This will use the System Title. Example: Lighthouse. This will be the text or phrase that’s next to the Lighthouse logo at the top left of the navigation bar. |
| System URL | This will use the Systems URL. Example: torque.lighthouse.torque.software |
Report Attachment
The new Report Attachment Merge Fields will not appear as content on the Notification Template but will when triggered, attach the report.
| Field | Description |
| Report Name – PDF Format | The available saved Report’s name will appear with the term “- PDF Format” appended to them. This will appear as a merge field but once it is sent, the merge field will be blank but attach the PDF version of the saved report to the email. |
| Report Name – Excel Format | The available saved Report’s name will appear with the term “- Excel Format” appended to them. This will appear as a merge field but once it is sent, the merge field will be blank but attach the Excel version of the saved report to the email. |
Once you have completed adding any content including any formatting using the WYSIWYG Tools and any Merge fields. Click Update at the bottom right of the formatting popup.
Step 7: Click Edit next to Footer and update any explicit footer required for the email notification using the WYSIWYG. If no Footer, is added or edited on the Notification Template then it will use the System Default Footer.
Step 8: Once happy with the Notification Template – Click Save at the bottom right of the Template Edit Screen.
Step 9: Click Notifications Tab
Step 10: Give your Notification a Name so other people know what it is and used for.
Step 11: Select your newly created Notification Template from the Dropdown list of Notification Templates.
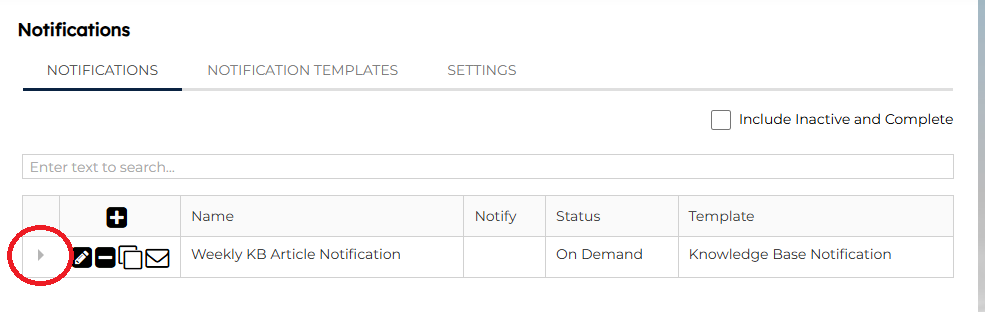
Step 12: Determine if you are sending the Notification on a frequency, if you aren’t then you can leave the Send On Field blank so you can trigger it on an ad-hoc basis by returning back to the notifications tab and clicking the Envelope Icon.
Step 12b – If you are sending the Notifications on a schedule or frequency then select the first date you want the email to send on, in the Send On Screen.
Step 12c – Select the amount of Maximum recipients, this isn’t a mandatory field but you can use this as a failsafe to prevent a system-wide email from being sent. Example: If you are sending a notification to only the 10 Members of a Processing Team then you can select 10 in the Maximum recipients so that if a mistake where the Processing Team group includes All Active Users then the Maximum recipient’s field will prevent all users from receiving this notification.
Step 12d – If you are sending the Notification on a schedule or frequency then click the Recurrent Notification check box to bring up more recurrence settings.
| Field | Description |
| Recurrent Intervals | This is a dropdown that contains Day(s) or Month(s). If you want to send the notification every 7 days then select days, alternative, if you want to send it every 6 months then select Month(s) from the dropdown |
| Recur every | Enter the number of Intervals you would like the Notification to be sent for. Example: Type in 7 here if you want it to run for 7 days or 6 if you have selected Months for intervals and want to send it every 6 Months |
| End after (Occurrences) | Click the Checkbox if you would like to set several occurrences for the notification to be sent. |
| Occurrences | This field will appear if End After (Occurrences) has been selected and allows a number to be inputted. This works in conjunction with the recurrent intervals. Example: If you only want the 6 Months reporting to be sent for 1 year then you would enter 2 in the Occurrences. |
| End On | If you want to opt for the Notification to stop or after a specific Date then you can use the End On date field to do this. |
| Active | The active checkbox when checked means the notification is Active, Unchecked it is Inactive. |
Adding Recipients
Once you have added the Trigger for the Notification. You need to add the Recipients. Click the carat or expand icon next to the Notification Trigger
Then click the [+] Icon to bring up the Group Selector. You then can search and select the group that will be the Notification Recipients. Click save at the bottom right and as long as you have checked the Active Checkbox your Notification is set to go as per your inputted requirements.